
This was originally created for a guest post at Crafting and Creativity!
Today's project was inspired by this picture I found on Pinterest. (You can follow me here:)
Edited: I want to add this button that My Marbles created: Isn't it awesome? I hope to be able to use it more often:

Edited*** This button clock was made by Mason Bee, and is just one of her many beautiful creations!
 |
I haven't seen a tutorial to make this particular kind of clock, but using instructions I found across the web, it was easy to adapt for a fabric clock.
Materials needed:
1 embroidery hoop (mine was about 7 inches)
Sturdy fabric of choice- I used burlap, but you could use anything
12 cute buttons
Embroidery Thread to match your buttons
Hot glue (optional)
Scissors
3/8 in or smaller Clock Movement Kit- about $7 at any craft store, or cheaper with a coupon!
Here's how I made mine:
First, I cut my burlap to fit my embroidery hoop, leaving enough fabric to stretch it taut on all sides. You may have to double layer your fabric, depending on how thin it is. You need something sturdy, and you don't want anything see-through. I placed it in the hoop and pulled it tight on the front and back.

Then, I laid out where I wanted my buttons to go and marked them with a water-soluble pen.

Next, I found the center of my button circle and marked it. This is where you will assemble your clock movement kit.

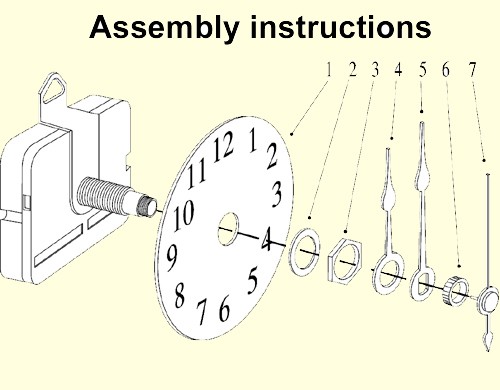
Now, mine didn't come with any directions, so I had to do some searching to find out how to put it together. Mine was an Artminds brand, but it is pretty standard. Here's how it goes together:
 |
| source |
Take all the clock parts out of the package and disassemble anything that is put together.
1. Cut a small slit in your fabric- enough to push the arm of the big black movement piece together. The rubber washer goes on the back- between the black box and your fabric.
2. Slide brass washer (circle) over the shaft
3. Attach the hex nut (the other larger brass pice)- screw it tight to the fabric
4. Gently but firmly press the hour hand onto the shaft at the 12:00 position.
5. Gently but firmly press the minute hand onto the shaft at the 12:00 position.
6. Gently screw minute hand nut (small brass circle) in place
7. Gently but firmly press your minute hand onto the shaft.

Once my movement kit was attached, I hot glued it to the back of the fabric for extra stability.

Next, I hot-glued my buttons in place- just a tiny dot. This isn't necessary, but it saves me a lot of time in the next step.
I hand-sewed my buttons to the fabric using two strands of embroidery thread. I think I made three or four stitches per button. Just make sure they're on good!
All that's left is making it look pretty. Carefully trim the excess fabric away from your hoop. I basically put my scissors flush with the hoop, then cut all the way around. I sealed the ends by drawing a thin line of hot glue across the cut edge. This keeps it secure and keeps it from fraying.
That's it- pop a battery into the movement kit and you've got a cute (and functional) clock for your craft room, or anywhere else you need a little cuteness. Can you imagine the possibilities with all the cute buttons out there?


I'm linking this up to:


this is super cute! would love to make one!!!
ReplyDeletePERFECT clock for a craft room!!! Great gift idea too. Nice job :)
ReplyDeleteBrilliant: such a pretty clock, and a perfect craft for Christmas gifts!
ReplyDeleteSuch a cute clock, it would make a great gift idea but I would probably keep it for myself if I made this. Thanks for sharing :)
ReplyDeleteIt's amazing your clock! so fun! have a nice, I'm a new followers, have a nice day from spain!
ReplyDeleteVery Cute! I love the Burlap and the buttons! So dang cute:) Thanks for linking up at Friday Frolic!
ReplyDeletei LOVE this! i've pinned that same clock on pinterest and have been wanting to make one. it's so helpful to see how you did it. thanks for sharing!!
ReplyDeleteSo cute! I'd love for you to share this at my linky party this week. It opens tonight: etcetorize@yahoo.ca ~
ReplyDeleteThis would be so cute in a baby's room! So glad you linked up with us and can't wait to see what you link up this week!
ReplyDeleteMarie
mylilpinkpocket.blogspot.com
so pretty!! i love the fun colors on the buttons.
ReplyDeleteI'd love for you to link this up to my link party, Your Whims Wednesday! http://mygirlishwhims.blogspot.com/2011/11/your-whims-wednesday-32-and-features.html
You did a great job! I just wanted to let you know that I've included this in our Button Crafts roundup on the FaveCrafts Blog: http://www.favecraftsblog.com/link-love-buttons-buttons-and-more-buttons/
ReplyDeleteIt's really cute :) Please let me know if you're ever interested in publishing your tutorials with FaveCrafts!
So happy to have found this because the stupid Artminds clock kits don't come with directions! So ridiculous. Thanks for the tutorial!
ReplyDeletex Hilary
http://thecleverlife.etsy.com
I simply love love love this Idea...
ReplyDeleteI am thrilled that you liked the clock that I made, but can you kindly actually put my shop name and not just a link.
ReplyDeleteLove it!!!!! I have to make one for my sewing room!!!! Thanks for sharing!!!!
ReplyDeleteThanks for taking time look around! They're really super simple to make. Have a great week :)
DeleteSooo pretty!!! Sharing :-) Can't wait to meet you in person at SNAP!!
ReplyDelete